
| Home | Info | ITstuff | Tricks... | Contact |
|
|
Welcome to the Footsfitters Tricks of the Trade page | ||||
|
|
When I was still at school, a favourite magazine was Car Mechanics and the first part to be read every month was a series by Barry Cade called "Tricks of the Trade", a tame garage mechanic/owner. I followed these for many years, some were more related to the car world than others but I used a lot over the years and I have learnt or discovered many more. Some of these tricks you may of seen before but hopefully there are some that are new and may be of help to you, some are old basic one, but even these may be of use to many of those who dabble in a workshop. Measuring Circlips
Thread files
Polarising Dynamos
Polarising is done with the dynamo fitted to the engine. Remove the wire from the smaller lucar terminal (may be marked "F" ) now you need to "flash" a live wire onto the terminal, only for a second or two. This will energise the field windings so that when the dynamo is rotating the regulator will apply a small varying voltage to the Field terminal to increase of decrease the amount of output.
Roll Pins/Spirol Pins
Hammer HandlesNo "Two Ronnie's Fork Handles" sketch here!! This trick was passed on to me as an apprentice by my long suffering Foreman. When replacing any broken ash handle, remove all traces of the old one from the head keeping the two steel wedges and the old shaft for later.Now shape the handle (if required) to near the size required for the head, usually there is a rapid taper at the start of the head, make the shaft small enough, but not too much as you require it to be a tight fit. Next cut a slot in the end of the shaft across the wider part of the shafts oval cross section and cut to a depth of approx 2/3 of the head thickness. To fit the head, place it on the floor if its a sledge hammer or anvil if a smaller hammer, offer the new handle up to the head and tap the shaft just a tiny way into the head, just enough so that you can pick the head up off the floor/anvil still attached to the shaft. Now, holding the shaft and head in mid air, strike the end of the handle with firm square blows so as not to slit the shafts end grain. You should find that the shaft easily knocks into the head as if like magic, continue driving it through until the shaft exits the other side of the head. Now trim the excess shaft down to the hammers head then take the old shaft you kept from the beginning and cut a wedge length ways with the grain to fit into the slot you cut into the new shaft. Smooth the wedge if possible before knocking it into the shaft/head as far as it will go. Trim the excess off before taking the two steel wedges from earlier, these have to be knocked into the shaft across the wooden wedge to expand the narrow section of the new shaft, if the end grain is sloping across the wedge, it is normal to place the steel wedges aligned to the grain. Once knocked in flush sand the shaft/wedges down flush with the hammers head to finish the job. Final tip, if at a later date the shaft has become dry and the head loose, check the wooden & steel wedges are present before throwing the hammers head into a bucket of water for several hours to soak up water and expand the shaft to fit tight again.
PunchesAlways a bone of contention with the uninitiated is the incorrect selection of Punches. With all punches, it is important to keep the risk of steel splinters low by regular removal by grinding of any burring around the punches striking head. It is also prudent to wear safety goggles and it can be useful to hold a punch in a welders gloved hand, or for small sizes, in a pair of Vice Grips
|
| Last updated 27-07-2009 0:01 AM | Copyright©Footsfitter Home • Info • ITstuff • Tricks • Contact |
 Internal?
External? That's the easy bit, when the man says "I want a 30mm
one", how do you measure it? First measure the diameter of
the shaft (external) or the diameter of the hole the shaft will fit (internal).
Now find your circlip and measure from the outer edge on one side to the
inner edge on the other. If your shaft was 30mm, then this is what the
measurement will need to be to get a good correct fit. The only other dimension
to check is the width or thickness of the clip.
Internal?
External? That's the easy bit, when the man says "I want a 30mm
one", how do you measure it? First measure the diameter of
the shaft (external) or the diameter of the hole the shaft will fit (internal).
Now find your circlip and measure from the outer edge on one side to the
inner edge on the other. If your shaft was 30mm, then this is what the
measurement will need to be to get a good correct fit. The only other dimension
to check is the width or thickness of the clip.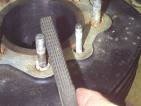 These
are handy to tidy up a few damaged threads, particularly if you have
few available thread dies/die nuts to get you out of trouble. They are
available to suit the different thread pitch (distance from one thread
to the next) found on AF, UNC, Metric and others. You use them in the
same way as an ordinary file except that you "roll" it round
the thread as you file.
These
are handy to tidy up a few damaged threads, particularly if you have
few available thread dies/die nuts to get you out of trouble. They are
available to suit the different thread pitch (distance from one thread
to the next) found on AF, UNC, Metric and others. You use them in the
same way as an ordinary file except that you "roll" it round
the thread as you file.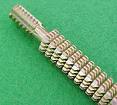 This
is another style with a handy internal chasing tip. Each file has four
different thread pitches on each end making eight per file.
This
is another style with a handy internal chasing tip. Each file has four
different thread pitches on each end making eight per file. 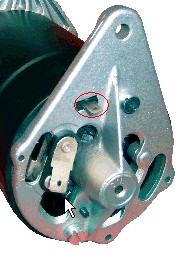 If
you fit a new dynamo, or you have one that has been fitted but not run
for some years. there will b a fair chance that you will have to Polarise
it. Polarising sets up the magnetic field in the dynamo windings that
make the dynamo generate power.
If
you fit a new dynamo, or you have one that has been fitted but not run
for some years. there will b a fair chance that you will have to Polarise
it. Polarising sets up the magnetic field in the dynamo windings that
make the dynamo generate power.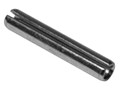 Also
known as "Spring Tension Pins" These are
available in Metric and Imperial and are used as a means of locking/locating
by the compressing of the spring steel pin as it is driven into hole
which is slightly smaller in diameter than the pin. In cases where extra
strength may be required, it is possible to insert a smaller pin into
the first pin.
Also
known as "Spring Tension Pins" These are
available in Metric and Imperial and are used as a means of locking/locating
by the compressing of the spring steel pin as it is driven into hole
which is slightly smaller in diameter than the pin. In cases where extra
strength may be required, it is possible to insert a smaller pin into
the first pin. 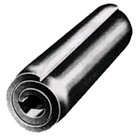 Another
way round this is to use a "Spirol Pin" As the name suggests
it is formed from a spring steel strip rolled round Swiss roll spiral
style to makes more solid and less brittle pin
Another
way round this is to use a "Spirol Pin" As the name suggests
it is formed from a spring steel strip rolled round Swiss roll spiral
style to makes more solid and less brittle pin  Taper pin punch. As the name states, the punch is tapered down to the specified diameter. Always use taper punches to start moving the item you are trying to remove. The taper is designed to focus the impact down to the tip of the punch and to also create a much stronger punch that will resist bending and buckling when trying to move seized pins.
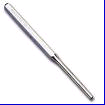 The parallel pin punch, as its name suggests has a parallel shaft the same diameter from the tip to the hex shank. These punches are designed to reach inside holes to knock out pins/bolts that have already been shifted with a taper pin punch. Parallel punches are prone to bending if used as hard as taper punches. Without the stiffness of a taper, parallel punches easily bend and rapidly become of little use.
 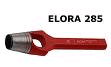 Hollow/Wad/Gasket punches are designed to cut out circles of soft material in the manufacture of gaskets or for putting fixing holes in rubber or plastic materials. They must be kept sharp by being ground around the outside of the "tube" and must always be used with a soft block of wood or plastic as a backing to cut into once through the material being cut.
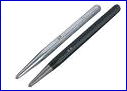 Centre punches are for marking the point where you wish to drill a hole. Similar to a taper pin punch except that they usually have a 60 degree point.
 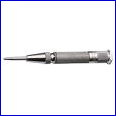 Usually found in fabricating shops, the Automatic centre punch is for fast quick centre dot marking with one hand. The other popular area of use is by the criminal fraternity for quickly smashing toughened glass vehicle windows, so don't forget to leave it in the tool box when calling into the pub on the way home..........going equipped to burgle isn't too clever at the moment!!